Systems Management
Automating Citrix Golden Image Creation with Application Workspace, WDS, and MDT
Topics: Systems Management
Why On-Premises Still Matters
Lately at Recast, we’ve noticed an interesting shift. More and more organizations are revisiting the idea of on-premises solutions instead of moving everything to the cloud.
We talk to companies that are wrestling with software decisions—often because they don’t want to be locked into a cloud-only setup.
That’s where Application Workspace stands out. It runs in the cloud or fully on-premises. For teams that prefer to keep everything inside their own infrastructure, you don’t sacrifice functionality—and no data leaves your environment.
On-Premises Citrix Environments: Can Application Workspace Build the Golden Image?
We also see this trend in another way: many organizations still run on-premises Citrix environments. A question I hear a lot is:
“Can Application Workspace be used as part of the Citrix Golden Image creation process?”
As is often the case, the answer is: absolutely. At Recast, we partner with teams to fit their IT strategy while staying flexible within the Application Workspace ecosystem.
That brings me to the next logical question—one we hear from both customers and partners:
“Okay, but what does that process actually look like?”
That’s why I’m dedicating this post to a deep dive on how Application Workspace fits into the Citrix Golden Image creation workflow.
Why Automate Your Citrix Golden Image
If you’ve been working with Citrix for a while, you know how critical it is to have a stable and consistent foundation for your virtual desktops and servers. That foundation is what we call a Golden Image, essentially a master template from which all your machines are cloned.
In this blog, I’ll use Machine Creation Services (MCS) as the example, but the same principles apply to Provisioning Services (PVS). In both cases, your environment relies on a single image—whether it’s a vDisk or a master VM. And in both cases, that image needs to be clean, consistent, and up to date. That’s where automation becomes your best friend.
I use Microsoft Deployment Toolkit (MDT) with Windows Deployment Services (WDS) to automate Golden Image creation. Sure, there are other ways to do it, but this combination of MDT/WDS is one of the most widely used and well-known in Citrix environments, which is why I’ve chosen to focus on it here with the addition of Application Workspace.
What MDT Does in a Citrix Golden Image Build
- Automated OS deployment – Instead of manually installing Windows, you run a predefined task sequence that handles everything for you.
- Integrated Windows updates – Add updates directly into your image so it’s fully patched from the start.
- Multi-image management – Useful if you need different images for different departments or hardware profiles.
- Sysprep preparation – Ensures your system is generalized and ready for cloning.
What Application Workspace Adds
- Driver, certificate, and software installation – Installs the latest versions of apps from the Recast Setup Store, or deploys legacy/custom apps from your own Application Workspace.
- Configuration settings – Registry tweaks, custom scripts, file copies, license keys, and more.
Step-by-Step: Build a Citrix Golden Image with MDT/WDS and Application Workspace
While WDS is commonly paired with MDT for PXE booting, it’s not a strict requirement. MDT can use WDS for pre-boot services, but you can also skip PXE entirely by using offline media. That flexibility is one of the reasons this setup works so well. In many environments, you’ll see MDT and WDS installed on the same server.
Step 1 — Prepare Your MDT Server
Start by setting up the basics:
- Install MDT and the Windows ADK, including the WinPE add-on.
- Create a Deployment Share—this will be your central repository for images, scripts, drivers, and more.
- Import your Windows 11 ISO into MDT.
- Install the WDS feature on the same server.
- Configure WDS:
- Go to MDT and generate a boot image.
- Then go to WDS and import the boot image so PXE clients can boot from it.
Step 2 — Create Your Task Sequence in MDT
Now it’s time to define what happens during deployment:
- In MDT, create a new Task Sequence.
- Select Standard Client Task Sequence (Windows 11).
- Configure the sequence to include:
- OS installation
- A custom task to install the Application Workspace Agent via PowerShell.
- After the agent installs, it automatically launches a deployment that handles:
- Driver injection
- Application installation
- Windows settings (language, timezone, etc.)
- Custom configurations (registry tweaks, file copies, etc.)
- Citrix VDA installation
Step 3 — Build the Golden Image VM (PXE or ISO)
- Create a new virtual machine (e.g., in VMware or XenServer).
- Boot the VM using PXE or an MDT-generated ISO.
- Let the MDT task sequence install Windows and apps (triggered by Application Workspace).
Step 4 — Generalize with Sysprep
- Once the installation is complete, MDT will automatically run Sysprep to generalize the image.
Step 5 — Capture the Custom Image
- Take a snapshot of the VM. You can automate this with PowerShell—modules are available for both VMware and XenServer.
Step 6 — Deploy with MCS or PVS (Update Machine Catalog)
- Use Machine Creation Services (MCS) or Provisioning Services (PVS) to deploy virtual desktops from your master image.
- For MCS, update your Machine Catalog to the latest snapshot.
Run the MDT Task Sequence (Application Workspace Agent Bootstrapper)
In this Golden Image build, I use a PowerShell script in MDT to run the Application Workspace Agent Bootstrapper. What this does is:
- Copies the necessary files from the MDT Deployment Share down to the Golden Image VM.
- Installs the latest version of the Application Workspace agent.
- Registers the VM in the Application Workspace zone that’s installed on-premises (or in the cloud—your choice).

- Starts a deployment—see the example below.
Custom Tasks
I created two custom tasks in the Standard Client Task Sequence “W11 Golden Image.”

One custom task in the MDT task sequence runs a PowerShell script that starts the Application Workspace Bootstrapper from the command line. It’s a simple step that sets everything in motion, followed by a reboot.
Right after that, another custom task cleans up a temporary RAW directory. A second PowerShell script handles the cleanup—the first script creates RAW during the bootstrap process.
To keep things tidy, both scripts live in the Scripts folder under the MDT Deployment Share. That way, everything stays centralized and easy to maintain.
Custom Task 1: Bootstrapper Script
 | # Define source and destination paths $MDTDeploymentShare = “\\10.40.0.4\DeploymentShare$” $SourceFolder = “$MDTDeploymentShare\Applications\AW” $DestinationFolder = “C:\Temp\RAW” # Create destination folder if it doesn’t exist if (!(Test-Path -Path $DestinationFolder)) { New-Item -ItemType Directory -Path $DestinationFolder -Force } # Copy files try { Copy-Item -Path “$SourceFolder\*” -Destination $DestinationFolder -Recurse -Force } catch { Write-Error “Error copying files: $_” } # Install with AW Agent BootStrapper Set-Location $DestinationFolder .\AgentBootstrapper-Win-2.1.0.2.exe /startDeployment /waitForDeployment /logPath=C:\Windows\Temp /certificate=.\AgentRegistration.cer |
Custom Task 2: RAW Directory Cleanup
 | $DestinationFolder = “C:\Temp\RAW” Remove-Item $DestinationFolder -Force -Recurse -ErrorAction SilentlyContinue |
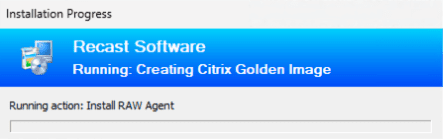
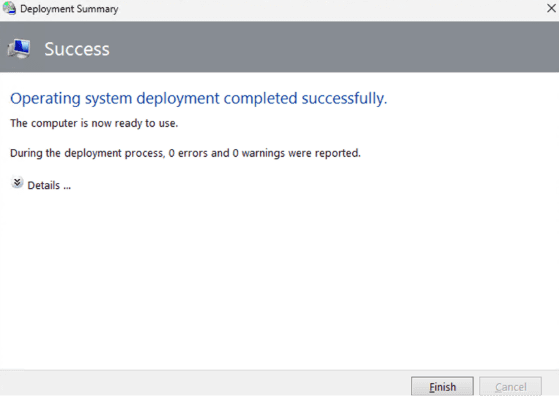
Kick Off the Build
We kick things off by PXE-booting the VM for the Golden Image. We then fire up the Standard Client Task Sequence “W11 Golden Image.”
We’re on the move:
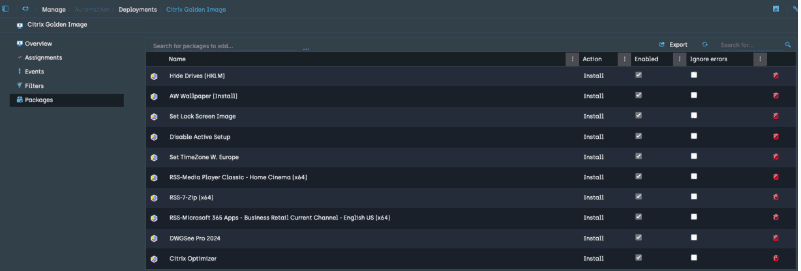
Validate Deployment in Application Workspace
I jumped into Application Workspace to check deployment status—everything installed successfully. Clean and repeatable.

Key Takeaways and Next Steps
Automating your Citrix Golden Image creation doesn’t have to be complex or time-consuming. With MDT, WDS, and Application Workspace, you can build a clean, consistent, and fully customized image that fits perfectly into your on-prem or hybrid environment. The process is repeatable, scalable, and gives you full control over every step—from OS deployment to app installation, configuration, and cleanup.
Whether you’re working with MCS or PVS, that’s the goal: consistency, efficiency, and flexibility—working together.